Heart Rate Zones for Interval Training Explained

Heart rate zones tell you exactly how hard your cardiovascular system is working during interval training. Without them, "hard" and "easy" are subjective guesses. With them, you can target specific physiological adaptations, avoid overtraining, and verify that your HIIT sessions are actually reaching the intensities needed to produce results.
Here's a clear breakdown of all five zones, how to calculate yours, and how each one applies to interval training.
The 5 Heart Rate Zones
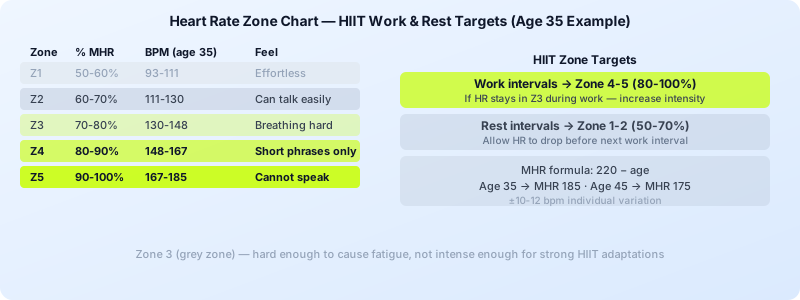
Heart rate zones are expressed as percentages of your maximum heart rate (MHR). The most widely used 5-zone model divides training intensity as follows:
Zone 1 — Recovery (50-60% MHR) Very easy effort. Breathing is completely comfortable, conversation effortless. Used for warm-ups, cool-downs, and active recovery between hard sessions. The body primarily burns fat as fuel. Not used as a HIIT work interval.
Zone 2 — Aerobic Base (60-70% MHR) Light to moderate effort. You can hold a conversation but notice you're breathing. This is the foundation of all endurance training — the zone where mitochondrial density and fat-burning efficiency improve. Zone 2 vs HIIT training are complementary: Zone 2 builds the base that HIIT peaks from.
Zone 3 — Aerobic Threshold (70-80% MHR) Moderate-hard effort. Conversation becomes difficult. Often called the "grey zone" — hard enough to cause fatigue but not intense enough to produce the strong adaptations of Zones 4-5. Many people spend too much time here without realising it.
Zone 4 — Lactate Threshold (80-90% MHR) Hard effort. Breathing is heavy, speech limited to short phrases. Lactate begins accumulating faster than the body can clear it. Sustained Zone 4 work builds lactate threshold — the ability to sustain faster paces before fatigue accumulates. Standard HIIT work intervals land in Zone 4.
Zone 5 — VO2 Max (90-100% MHR) Maximum effort. Breathing is maximally laboured, cannot speak. Can only be sustained for 30 seconds to a few minutes. Produces the strongest cardiovascular adaptations. Tabata, sprint intervals, and 30-20-10 protocol sprint segments target Zone 5.
How to Calculate Your Maximum Heart Rate
The standard formula: MHR = 220 − your age
Example for a 35-year-old: MHR = 220 − 35 = 185 bpm
Zone calculations for this example:
- Zone 1: 93-111 bpm
- Zone 2: 111-130 bpm
- Zone 3: 130-148 bpm
- Zone 4: 148-167 bpm
- Zone 5: 167-185 bpm
Limitations: The 220-minus-age formula has a standard deviation of ±10-12 beats, meaning your actual MHR could be 10-12 bpm higher or lower. For most recreational athletes this is accurate enough. For precision, a field test is better:
MHR field test: After a thorough warm-up, run or cycle at maximum effort for 3 minutes. Increase to absolute maximum effort in the final 30 seconds. Your peak heart rate in the last 30 seconds approximates your MHR.
Which Zones Apply to HIIT Training
The interval structure of HIIT is specifically designed to accumulate time in Zones 4 and 5 by using rest periods to allow partial recovery — making it possible to repeat high-intensity efforts multiple times.
Work intervals → Zone 4-5 (80-100%) Every HIIT work interval should push you into Zone 4 minimum, Zone 5 for sprint-based work. If your heart rate during work intervals stays in Zone 3 or below, the intensity is insufficient to produce the adaptations that make HIIT effective.
Rest intervals → Zone 1-2 (50-70%) Rest periods should allow heart rate to drop to Zone 2 or lower before the next work interval. Active recovery (walking, slow cycling) drops heart rate faster than standing still. The length of rest determines how recovered you are for each subsequent interval.
Why this matters practically: If your heart rate doesn't drop into Zone 2 during a 60-second rest, you either started too hard (unsustainable) or need a longer rest period. Conversely, if heart rate fully returns to Zone 1 during a 90-second rest, you may be resting too long for the metabolic demands you're targeting.
Heart Rate Zones by Training Goal
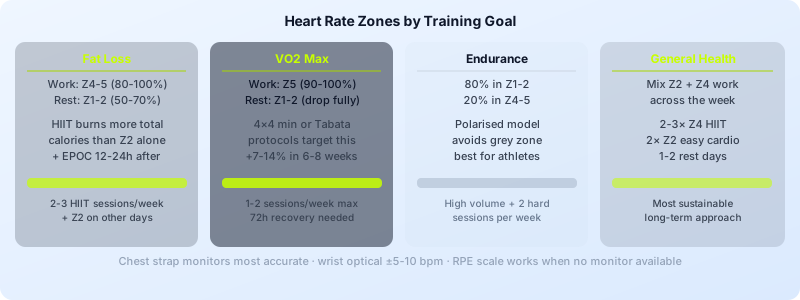
Goal: Fat burning Counterintuitively, Zone 2 burns the highest percentage of fat per calorie. But HIIT in Zones 4-5 burns more total calories — and produces EPOC (afterburn) that continues fat oxidation for 12-24 hours post-session. For total fat loss, HIIT wins despite lower fat percentage during the session.
Goal: Cardiovascular fitness / VO2 max VO2 max improvements require sustained time in Zone 5. The 4×4 minute protocol (90-95% MHR) and Tabata both target this zone effectively. Zone 3-4 work improves lactate threshold but has a smaller VO2 max effect.
Goal: Endurance performance A polarised model — 80% Zone 1-2, 20% Zone 4-5 — produces the best endurance results for trained athletes. Zone 3 is underused in elite training because it causes fatigue without the specific adaptations of either lower or higher zones.
Goal: General health and fitness Any combination that includes regular Zone 4 sessions 2-3 times per week, with Zone 2 work on other days, produces comprehensive cardiovascular health improvements. This mirrors the weekly workout programming approach used by recreational athletes.
Monitoring Heart Rate During Interval Training
Chest strap monitors: Most accurate. A Polar H10 or Garmin HRM-Pro measures electrical heart activity directly. Responds instantly to intensity changes. Best for precise zone training.
Wrist-based optical monitors (Apple Watch, Garmin, Fitbit): Convenient and good enough for most recreational athletes. 5-10 beat accuracy in most conditions. Less reliable during rapid intensity changes (the lag is 10-15 seconds behind actual HR).
Perceived exertion (RPE): The 1-10 scale correlates reasonably well with heart rate zones once you've trained consistently:
- RPE 4-5 ≈ Zone 2
- RPE 6-7 ≈ Zone 3
- RPE 8 ≈ Zone 4
- RPE 9-10 ≈ Zone 5
For most HIIT sessions without a monitor, targeting RPE 8-9 during work intervals and RPE 4-5 during rest is sufficient to approximate Zones 4-5 and 1-2 respectively.
Zone Drift During HIIT Sessions
An important phenomenon: heart rate drifts upward during prolonged HIIT even at constant effort. Called cardiac drift, it occurs because:
- Core temperature rises over the session
- Blood plasma volume decreases from sweating
- The heart must pump faster to deliver the same oxygen
In practice, interval 1 at 85% effort might produce Zone 4 HR. By interval 8 at the same effort, you may be in Zone 5 simply from cumulative heat and dehydration — not because you're working harder.
This is why staying hydrated during HIIT matters — dehydration amplifies cardiac drift and causes heart rate to rise faster than effort level justifies.
Your interval timer handles the work/rest structure that keeps HIIT effective across all zones. Set your protocol in the Interval Timer app and pair it with a heart rate monitor — together they give you precise control over every training session.